By using the Business Manager app, you can stay up to speed on your store’s business health, make any necessary updates to your menu, keep your customers informed of store hours, receive real-time notifications, and review feedback.
What is the Business Manager app?
The Business Manager app is an app you can download on your phone to easily manage your store on the go or when you’re off premises. The Business Manager app can help you:
Track live orders: Manage in-progress orders and see your Dasher's status, location, and arrival time. Mark an item out of stock or cancel an order if you’re having trouble fulfilling it. Call your customer or Dasher if there are any order issues, and chat with or call DoorDash Support anytime.
Manage store availability and hours: Update store hours, closures, and more. Plus, easily switch to view any of your other stores on DoorDash.
Get daily business data: View daily, weekly, and monthly performance recaps and get insights into your top-performing menu items on DoorDash.
Use with your Order Manager tablet app or POS: Use in conjunction with your existing order protocol.
Run a campaign and view campaign reporting: Start, edit, and view your campaigns on the go, allowing you to track your advertising on DoorDash Marketplace and Online Ordering
See your payouts: Track incoming sales and see your payment history.
Check your store health: Prioritize which DoorDash tools and services to start using next.
How to install the Business Manager app on your phone
The Business Manager app lets you edit your menu, track orders in progress, resolve issues, access support, monitor business performance, and get real-time notifications — all on your phone. It is available in both the Apple Store and the Google Play Store.
Open the corresponding store for your device and download the DoorDash Business Manager app on Apple or Google Play. Or, scan the QR code below:

Please note: The Business Manager app is currently only available in English.
Once installed, tap open to launch the app.
When you first log in, you’ll be asked to provide your phone number for authentication.
Once you've done that, tap Continue.
Enable real-time push notifications in the toggle bar to receive updates about store issues and end-of-day business performance recaps. Tap Continue.
You’ll see a pop-up asking you to allow the DoorDash Manager app to send you notifications. Be sure to select OK for full functionality.
If you select Don’t Allow, you’ll need to re-enable notifications via your device’s Settings menu.
Something to keep in mind: Push notifications ensure you don’t miss out on sales because your store is unintentionally marked as closed on the app.
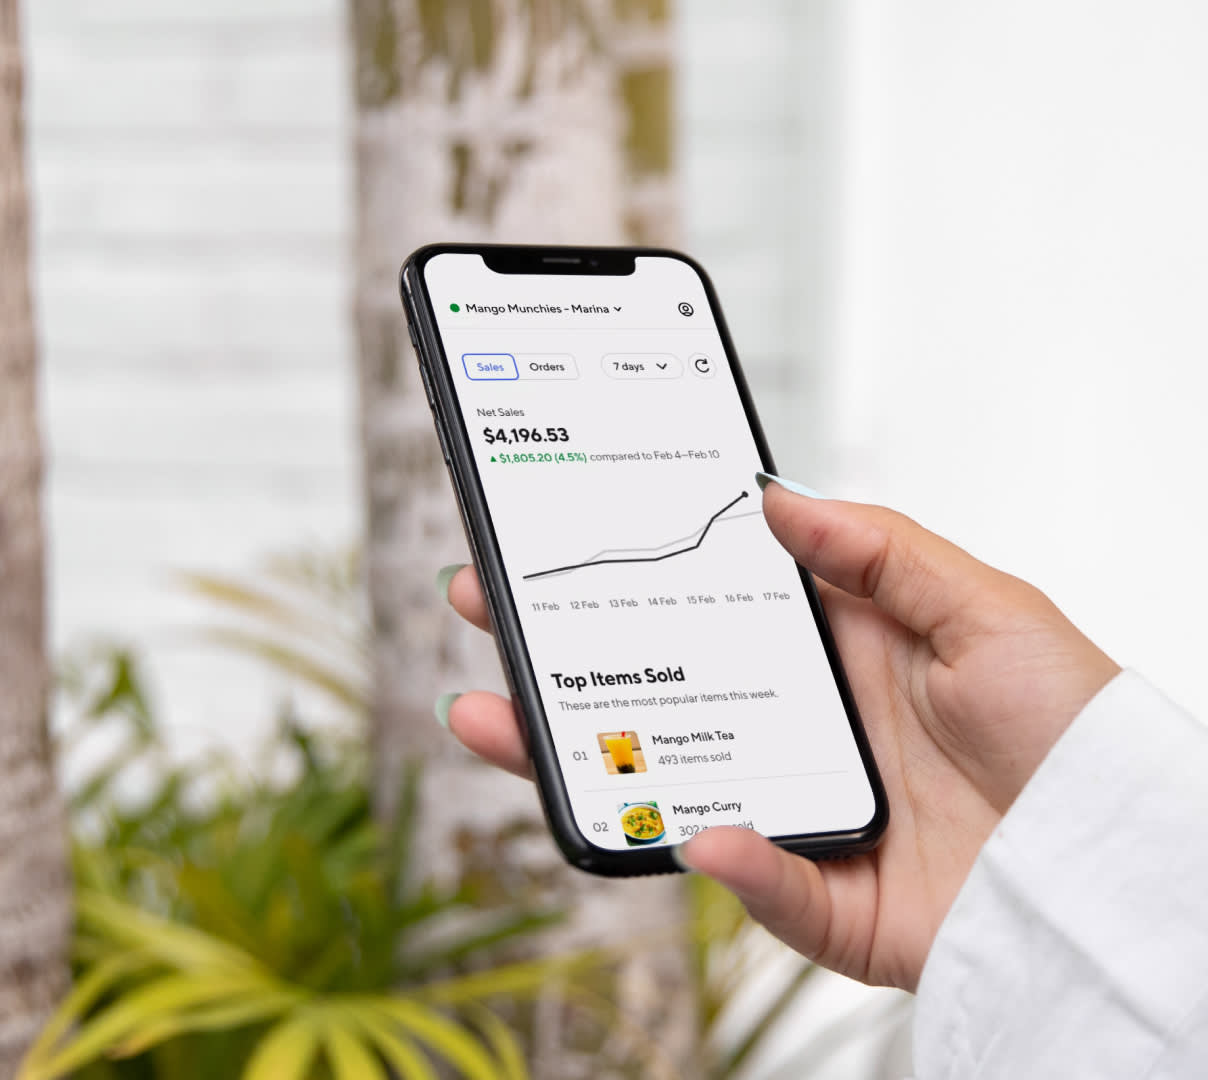
How to track business health
The Home tab of your Dashboard allows you to see Sales, Order Volume, and Top Selling Items in a specific time range.
Sales
On the homepage, select one of the viewpoints shown at the top of the screen: today, yesterday, 7 days, or 30 days.
If you select today, you’ll be able to:
Monitor sales and orders in real time by tapping the refresh arrow
Analyze partial-day trends
Multiple locations
If you own multiple locations, the home screen will display metrics across all stores. You can confirm this by noting:
The business (or group) name at the top left
Your bottom navigation bar will only show 3 tabs (Home, Support, and Reviews)
To switch store locations, tap the arrow next to the store name in the top navigation bar.
Depending on how your business was set up on DoorDash, it may take 1-2 taps to get to an individual store (tap the arrow to navigate). You can also locate the store in the search bar.
Tap the store you’d like to view, and both the app dashboard and metrics will automatically refresh.
How to change your store status
In the Store tab, select Pause Store.
Tap Pause Store to pause an open store and choose when it reopens (in an hour, the next day, etc).
View or add special hours or closures by tapping the right-hand arrow next to Special Hours and Closures.
Something to keep in mind:
When you change your store status in the app, it will be reflected on the Tablet and Portal (and vice versa).
POS users may need to edit hours directly within their POS system.
How to update your store hours
From the Store tab, you can update your menu hours by tapping the right-hand arrow next to Regular Menu Hours.
If you have multiple menus for your store, scroll down to find the specific menu. Then tap the pencil to edit.
Check the box next to the day(s) of the week you’d like to update the menu hours for and tap Next.
Add new hours that show when you’re open or closed by tapping on the start or end time from the dropdown.
Tap Next and then Confirm.
How to add photos to your menu
Adding photos to your DoorDash menu is a great way to increase sales. In fact, according to a 2022 DoorDash study of over 15,000 small restaurants, menus with item photos get up to 44% more monthly sales. The process is simple. To upload a photo:
Within the Menu Manager, click on the item you want to edit.
Click on Add a photo or placeholder gray box to add a photo from your existing library or to take a photo. If taking a photo, make sure it is in landscape aspect ratio.
Next you can Edit the Photo and then Submit for Review. The review process usually takes about 3 days.
You can also use the Merchant Portal to add photos to your menu.
How to add and remove menu modifiers
Adding modifiers to your menu gives customers more control over their order and an opportunity for you to upcharge and increase your average order size.
Creating a modifier
Navigate to Menu and select Modifiers.
On the top right of the Modifiers Page, tap on the + button.
In the next screen, fill out the New Modifier Name, Setting, Options, and Price.
In the Used in section, tap on the Search Bar to find items to add the new modifier to.
Tap Save Changes.
Removing a modifier
In the Overview Tab, tap into a Menu Item.
Find the modifier you want to remove and tap the Three Dots on the top right.
A pop-up screen will appear. Click on the Remove From Item.
Tap on Save Changes.
You can also use the Merchant Portal to add modifiers to your menu.
How to run a campaign in the Business Manager app
If you want to run a DoorDash marketing campaign on the go, follow the steps below:

Open up a store or business in the Business Manager app.
Navigate to the More tab on the bottom right.
Under the Marketing section, tap on Run a campaign.
Browse DoorDash’s catalog of advertisement and promotion campaigns for Marketplace and Online Ordering. Click Select on the one you would like to set up.
Next, customize the campaign details, and start your campaign.
If you want to learn more on how to best set up a campaign, head over to Marketing 101: How to Use Ads & Promos.
View your campaign on the Business Manager app
You can keep track of your campaigns on the Business Manager app by following the below steps:
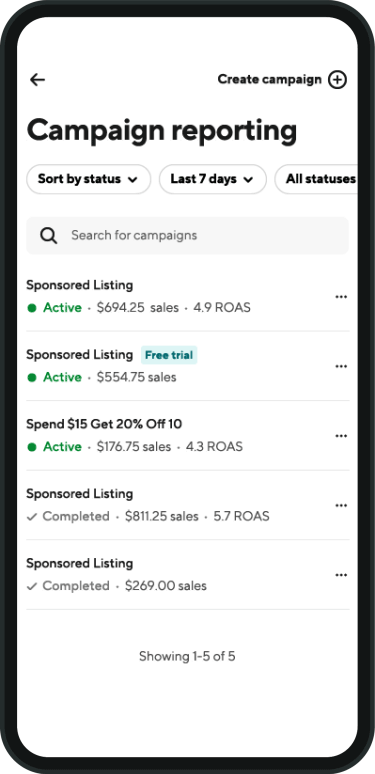
Open up a store or business in the Business Manager app.
Navigate to the More tab on the bottom right.
Under the Marketing section, tap on Campaign reporting.
View your list of active, scheduled, and completed campaigns.
Tap on any row to view the full campaign details, including sales metrics.
View your payouts on the Business Manager app
Check your payouts from anywhere by following the below steps:

Open up your store in the Business Manager app.
Navigate to the More tab on the bottom right.
Under the Financials section, tap on Payouts.
View the list of payouts within the selected time interval.
Tap on any payout row to view a specific payout’s details and transactions.
To learn more about your payouts, head over to How to Understand Your DoorDash Payout and Monthly Statement.
View your optimization score on the Business Manager app
You can view your optimization score and suggestions on how to grow your business with DoorDash by following the below steps:
Open up your store or business in the Business Manager app.
Scroll down to the section titled Optimize your business.
View the meter to see how much of your sales potential has been realized on DoorDash.
Keep scrolling down to access the feed, where you can find feature updates and suggested tools you can use to help grow your business. Click on each to learn more.
You can learn more about your optimization score in the How to Optimize Your Business on DoorDash article.
DoorDash Business Manager app FAQ
How do I mark a live order as out of stock?
In the Orders tab, tap Out of Stock to cancel an active order.
Why wasn’t I paid for an order I prepared, but canceled?
Even if you already prepared the food, cancellations that you initiate will not be paid for.
How does the DoorDash Business Manager app work differently than my POS?
Your Point-of-Sale (POS) System stores some of your store information instead of on the Doordash manager app. This means that your user experience will differ for certain actions and updates.
Use your POS system to:
Update your menu (items, modifiers, and photos)
Change menu and store hours
Mark items out of stock
Use your DoorDash Business app to:
Receive push notifications
Track business health
View active orders
Call customer, Dasher, or support
If you need to cancel a live order, make sure to call DoorDash Support.
Using the Business Manager app to edit your menu while you run a busy restaurant can help to save time and allows for on-the-go menu updates on your phone.
Learn more tips on how to manage live orders.